
Getting Started With Onshape
CAD software allow you to plan your design before your build to save time and resources
Onshape is a Cloud CAD program that runs on your browser. This makes it accessible and easy to collaborate with teammates.
Create a Student Account
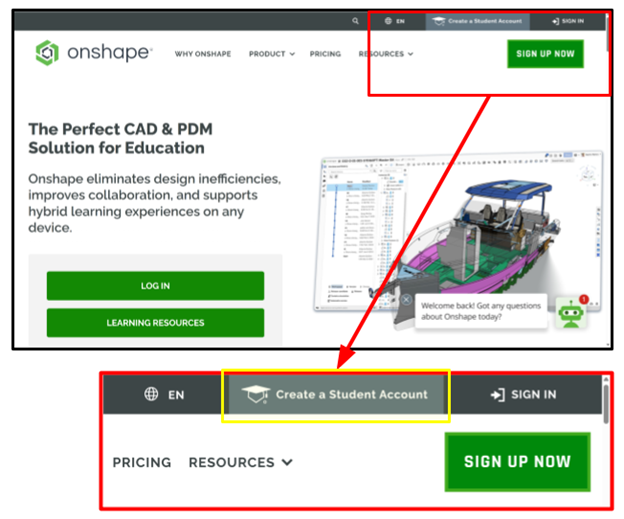
- Create a STUDENT Account, it’s free!
-
- After setting up an account, you will get a verification email so ensure to use an email you can easily access on your PC
- Unlike Fusion 360, Proof of Student ID is not needed
Vex V5 Parts Library
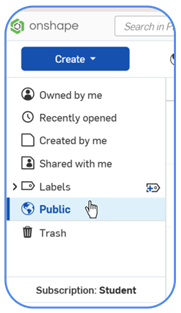
A Parts Library has documents containing most of the VEX parts you will need to use in your CAD. Create a Label to access them quickly:
- Go to your home page → Public.
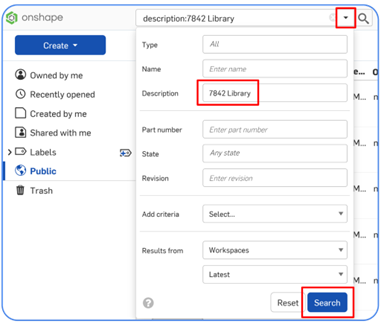
- Click ▼ next to the search bar → Advanced Search.
- Search: “7842 Library” (case sensitive).
- Click the top document → scroll down → hold Shift and select all documents.
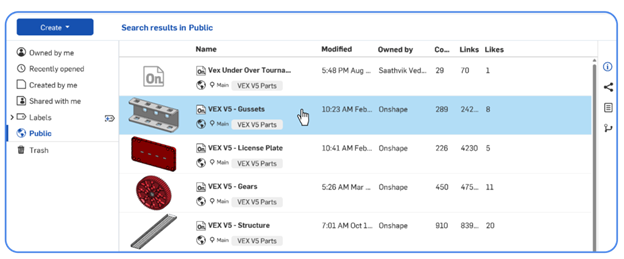
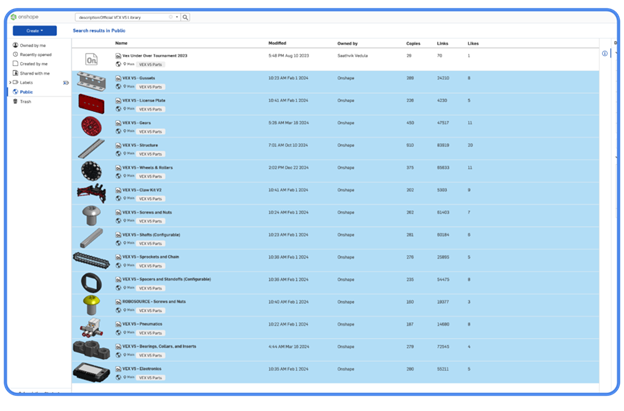
- Create a New Label in the left window.
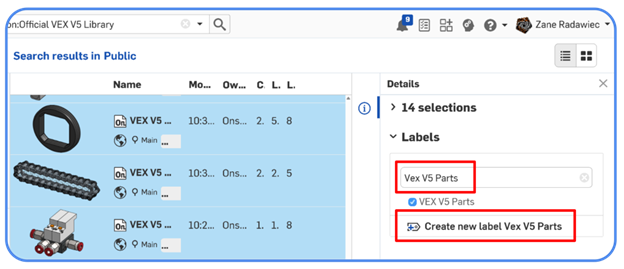
You now have the VEX Parts Library saved under a Label that can be used within your own projects.
Brief Introduction to Onshape
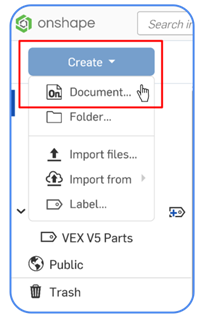
- Create a New Document in Onshape
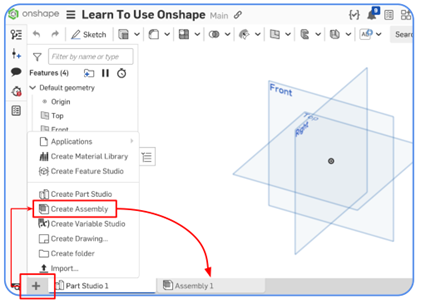
Onshape has a Multi-Tab Workflow
- The Three primary Tab types that you will use are:
- Part Studios: Used to create Sketches and Custom Parts
- Assemblies: Used to bring/connect parts together
- Drawings: Create 2D technical drawings
Focus on Assemblies for now.
New Assembly: Expand + at bottom left of document → select Assembly.
Inserting Parts in Assemblies
Click the Insert icon (top left).
Navigate to the home page → select your VEX Parts Library Label.
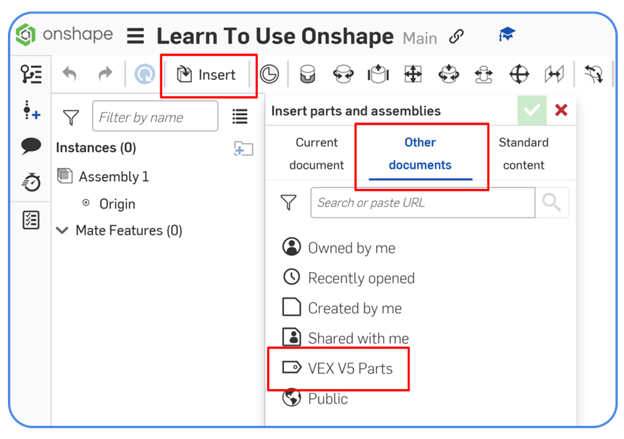
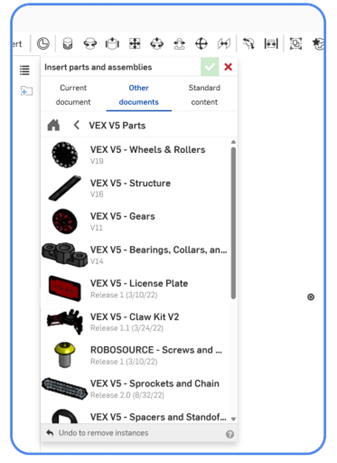
Within this Label you have access to the VEX parts which are divided into different documents:
Many parts have configurations (e.g., C-channel length/type):
- Click ▼ to adjust configuration.
- Enter values or select from dropdown.
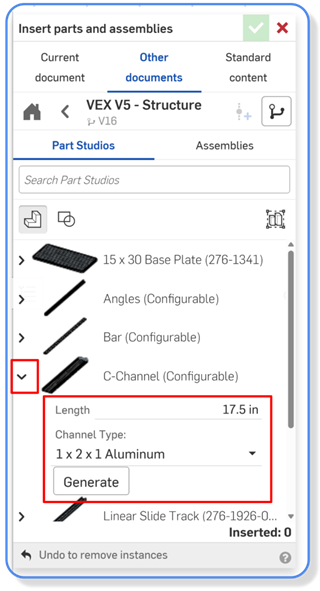
Click Generate → place the part → green checkmark to save.
To change a part’s configuration later: Right-click part → Change Configuration.

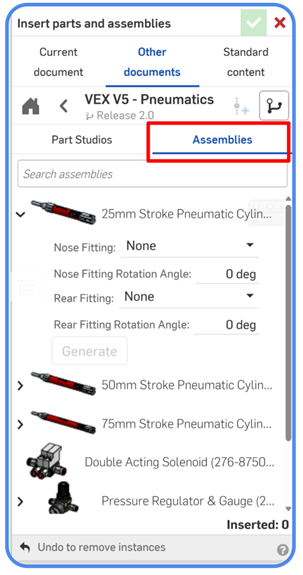
Some library items are pre-assembled (e.g., pneumatic cylinders, bearings).
- Select the assemblies window:
Rotating parts in assemblies
Select: Left-click a part.
Manipulate: Triad appears → drag circular handles to rotate.
Exact rotation: Type a number (e.g., 90).
Attach: Drag triad center to mate connectors or geometry for precise placement.
Free rotation is useful before fully mating parts.
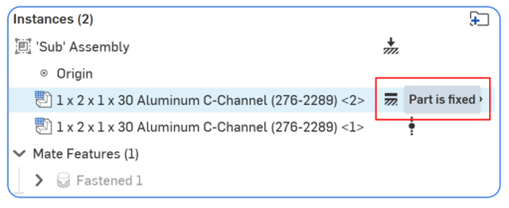
Fixing Parts
Fix one part to remove all degrees of freedom: Right-click → Fix.
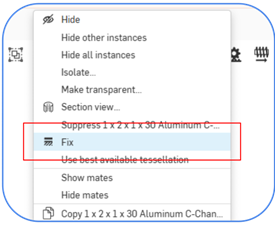
Fixed parts show a fix icon in the feature list. ![]()
Mates
In Onshape, the connections between parts are called mates.
Located top-left or press M.
Hover over a face → dots appear for Mate Connectors.
- When rolling over one of these dots, a small triad appears.
- Pay attention to the orientation of the triad.
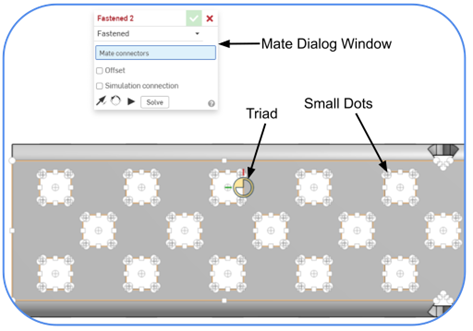
Each connector has X, Y, Z axes.
Each mate uses 2 connectors (one per part).
Flip/rotate axes if needed.
 Flip the primary axis, Z orientation, of the instances.
 Reorient the secondary axis; rotate the quadrant orientation (in the XY plane) of the instances by 90 degrees at a click.
Click the checkmark to commit mate and continue.

Selecting the center
For most parts, connections will be made on center points such as the center of a c channel hole or the center of a hole on a bearing.
For square geometry (like a C-channel hole):
- You can’t just click and get the center because it’s not round
Here’s how to connect parts together by select the center point of a flat face:
- Hover your mouse over the flat face where you want to find the center. You will see all possible mate points to snap to.
- Hold the Shift key on your keyboard to lock those points and click on the desired point (in the center) this is your first mate connector.
- Let go of shift now
- Mouse over part 2, and then hold shift again once the face points appear. Now select point 2.
Offsets
Many mates allow offsets:
- Negative Z moves parts apart (common).
- Positive Z moves parts into each other (rare).
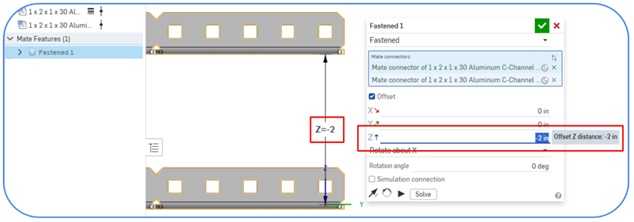
Editing a Mate
Double-click mate in feature list → change type or offsets.
| Tip |
|---|
| Hovering over a face and holding shift can also be useful for trying to get the right orientation of a mate connector that is on the edge of multiple faces. |
Types of Mates
| Mate | Motion Allowed |
| Fastened |
None (fixed), can set X/Y/Z offsets or rotation |
| Revolute |
Rotation along Z axis only |
| Slider |
Linear movement along Z axis only |
| Cylindrical |
Rotation + linear along Z axis |
The other types of mates are rarely used. You will mainly only use fasten and revolute mates, though slider mates will often be of use for mechanisms with linear movement and cylindrical for arm linkages.
| Note |
|---|
| The first mate connector may move if part isn’t fixed, ensure correct order. |
Sub Assemblies
Using sub assemblies can avoid unnecessary repetition and improve organization
Concept
Instead of copy and pasting a group of parts to be used in different parts of an assembly…
Avoid repetition: Create a subassembly (a separate assembly tab) → insert into main assembly.
- Changes in subassembly update all instances.
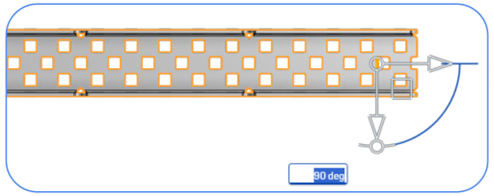
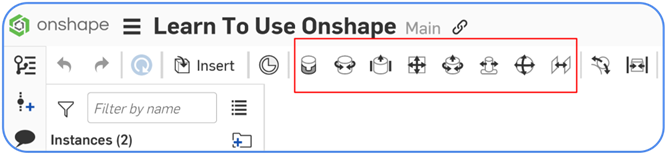
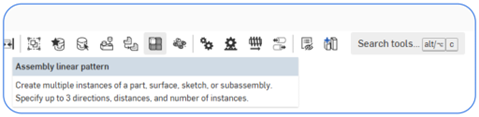
Assembly Linear Pattern
Another tool to avoid unnecessary repetition is the assembly linear pattern tool. Useful when repetitions of part(s) occur in a pattern (ex: Wheels and/or gears on a drivebase).
-
- Click
 , located in the top toolbar in an assembly
- With the focus in the Instances field, Select instances to pattern.
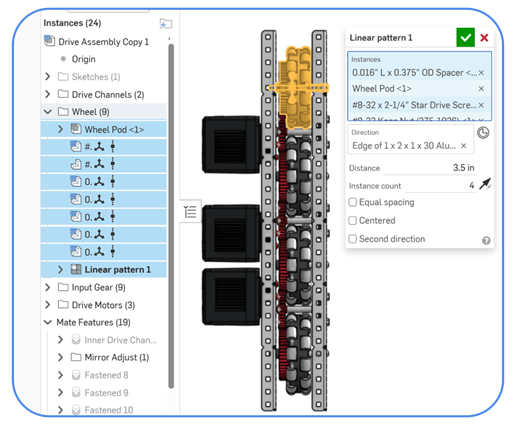
- Click
- Set focus in the Direction field, and then set the direction of the linear pattern: Click to select an edge or face of the entity along which to set the pattern.
- Enter distance & instance count.
- In the Instance count field, set the number of instances for your pattern. The minimum number of instances you can use is 1.
- Toggle the opposite direction if needed.
- Select Equal spacing for uniform placement.
See video below:
Organization/Management
Comments
See this Onshape resource: https://www.onshape.com/en/resource-center/tech-tips/tech-tip-comments
Version Control
See this Onshape resource: https://cad.onshape.com/help/Content/versionmanager.htm